Friday, September 23, 2011

These are a couple more address books.  I used Roxie paper pack and the Art Philosophy Cricut cartridge for the first.  This paper is available through January of 2012 at least from Close to My Heart.


 This one I used Sophia paper pack, which is also available through Jan 2012. The butterfly and the Address plate are both cut from the Art Philosophy Cricut cartridge.

Thursday, September 22, 2011

Mother's address book

My Mother asked me to help reconstruct her addresses after the fire.  This is the address book I made for her and the instructions.

The book is 4" by 7". Basic supplies are;
chipboard or other fairly stiff cardboard.
Strong adhesive (red sticky tape used here)
Decorative paper.
Card stock
1" O wire for binding machine.
Binding machine
(this can also be done professionally)
(above) front cover.  (below) inside pages


Cut 2 pieces of chipboard to 4" by 7"
Cut 2 pieces of Decorative paper to 6" by 9"
I used "Zig" glue to adhear chipboard to the center back of paper.
Trim corners of paper. 

 Place red tape on paper edges.
 Fold paper over chipboard carefully. Do both Pieces for front and back cover this way.
Cut 2 Pieces of contrasting paper to 3 7/8" by 6 7/8" and adhear to chipboard inside to cover folded seams and give inside a nice finished look.
 For tabs I cut 2 more pieces of chipboard to 4" by 7" then,  I cut 1/4" off part of 1 side of chipboard.
Fold paper around the 3 straight sides same as above.  The tab I simply made a straight cut in the paper where the tab was and then folded the paper.

The 2 tabs

For the binding I used a Zutter binder.  Punch holes according to manufacture instructions.

 I created the address pages using "Microsoft Excel".  I was able to print 3 pages front and back from 1- 8 1/2" by 11" Piece of white card stock.  The Card stock is fairly thick but it allowed for the double sided printing without one side showing through to the other. I cut the pages to 3 1/2" by 6 3/4".  Punch holes in the pages  according to manufacture instructions for inside pages.  I also added some lined loose leaf paper to the back for notes.  
Get it all lined up insert the O wire and bind it according to the instructions.
Decorate the front as desired.  I used Close to My Hearts Sonata paper and the Art Philosophy Cricut cartridge for the flower and the name plate.

Tuesday, September 13, 2011

Christmas card workshop

Saturday I am hosting a Christmas card workshop.  We will be making 12 each of 3 designs. I am really looking forward to it.
These are the 3 cards we will be doing.
This tutorial is for the top card in the picture above. The paper used in this tutorial is retired and no longer available from Close to My Heart.  The ribbon and stamp set and Art Philosophy are available through July 2012.
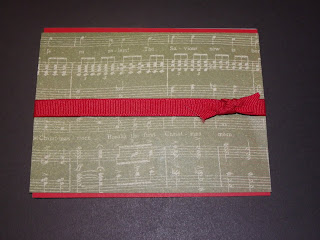
This is a standard card base 5 1/2 x 4 1/4.  Attach 1/2 x 5 1/2 inch Cranberry strips to top and bottom of card.

The paper is cut at 4 x 5 1/4 with  Cranberry ribbon wrapped to the back and attached with a glue dot.  Then tied as small piece of ribbon to make the simple knot.


Place paper with ribbon on card base so that the Cranberry strips just show a little.

Paper is cut to 2 1/2" x 2 1/2".  Stamp image on paper and edge ink edges.  Also add glitter to the star.  I used yellow Stickles.  Stamp set used is "Glory to God" D1483 CTMH

 The New England Ivy piece is cut from Close to my Hearts "Art Philosophy"  Cricut cartridge. 3 1/2".
Center stamped piece onto Green lacy square.

Attach 2 strips of foam tape to back of  New England Ivy piece.

Attach to front left of card and you are done.

Thursday, September 8, 2011

Bastrop Fire

My parents are among the people who lost homes this week to the wild fire in Bastrop County Texas.  I know that many people both in Bastrop and across Texas and across the country have lost homes to fires.  I want everyone to know that my thoughts and prayers are with you.  I am so sorry for your loss. May God Bless you as you go forward from tragedy.

Art Philosophy Ornament Tutorial

I hope I can make this clear for everyone.  If you do not know what a mountain fold and a valley fold are please look them up.  I am sure there is 1000 you tube videos.  They are simple,  very simple.
Text on the picture reads "I used the "hide Contour" button to edit out the center of the shape. I also edited out some very small triangles that I did not think would cut well."
I used cricut.com's craft room to do this step and cut out the shapes.  Cut 4 total.  This shape is on Close To My Hearts Art Philosophy Cartridge.  Email me for purchase details.
                                                  This is 1 cut out at 3 1/2 inches.

                                                                    For the base
 Cut 1 of the 2 pieces for the base in half.  Only 1 1/2 of these are used for the base. 


Score and mountain fold on green lines and score and valley fold on blue lines.  Cut on the red line. 

Add a small amount of glue to the wrong side of each mountain peak to hold the peaks together. Glue the 1 1/2 pieces together to make one piece.  Cut seams make into mountain folds.  

 Cut a small circle about 3/4 inch and add adhesive to it.  Xyron would work great. Please the center back of the ornament base on the adhesive side of the circle.  This stabilizes the base quite a bit.


For the Front
 You will need 2 of these pieces to make 1 front piece. Score and mountain fold on green lines.  Cut on red line.  Score and valley fold on blue lines.  

Glue both pieces together making cut seams into mountain folds. I used edge inking and glimmer mist on both pieces at this point.


                          I lined up 2 of the valley folds on front with 2 mountain folds on the base.


Using a small mount of quick drying tacky glue (i used fabri tack.  hot glue would also work)  only in the center of the base glue the 2 pieces together. hold this together till glue is stable.  For a little added stability I was able to use a small amount of clear glue (fabri tack) to glue the lined up mountain and valley folds.  This was a bit tricky but did add some stability. 


I also added a paper flower to the center.  I will do a separate tutorial for that. 

Embellish as you wish.

For the ribbon hanger I cut another 3/4 inch circle and added more adhesive to it and placed the ribbon between the 2 circles.


If you have any questions please leave a comment or email me.